Horsey Pages
- *Home
- *Sitemap
- *SEARCH THE SITE
- *Horse History
- *Horseman Tips
- *Horsemanship
- *Amazing Horse Hoof
- *Horse Anatomy Pictures
- *Rope Halters
- My Random Horse Thoughts
- *Tying A Horse
- *Bosal/Hackamores
- *Bad Horsemanship
- *Misc Horse Info
- *Trailer Loading
- *Training Videos
- *Hobbles
- *Horse Articles
- *Health and Medical Info
- Horse & Rider Fear
- Opposition Reflex
- *Answers to Questions
- *Cowboy Wisdom
- *Cookie Recipe for Horses
- *Horse Jokes
- *Cowboy Weather
- *Sites and Links
- *A Horse's Prayer*
- *Photos Rick and Horses
- *Clinics on Request*
- *Contact Rick
Think Like A Horse - Rope Halters
Rick Gore Horsemanship

Horses love it when their owners understand them.
Horsemanship is about the horse teaching you about yourself.
Rope Halters
Read This: METAL, MYTH & EQUINE MISERY to understand why switching to a rope halter is important to your horse.
Don't Leave Halters On Horses - Result Pics
Rope Halters have NO buckles, no snaps, and no stitching. They are one continuous piece of strong rope with knots. The rope, ends up being doubled when completed, which makes it very strong. With no snaps or buckles to break or get caught on things, the rope halter is a great resource for tying and working a horse securely.
The worst thing that can happen, when you tie a horse, is for a horse to pull and the halter, the snap or buckle breaksand the horse gets loose. Not only can the horse get scared and hurt, but worse is the horse just learned that it can get free by pulling or rearing, it just learned that it can break halters and it just learned that it does not have to accept being tied.
Bad lessons when you are trying to teach a horse to tie. You don't want the horse knowing it can get loose if it pulls, rears or fights being tied. If you rope halter has any metal on it or used metal snaps you are setting your horse up to fail and get hurt.


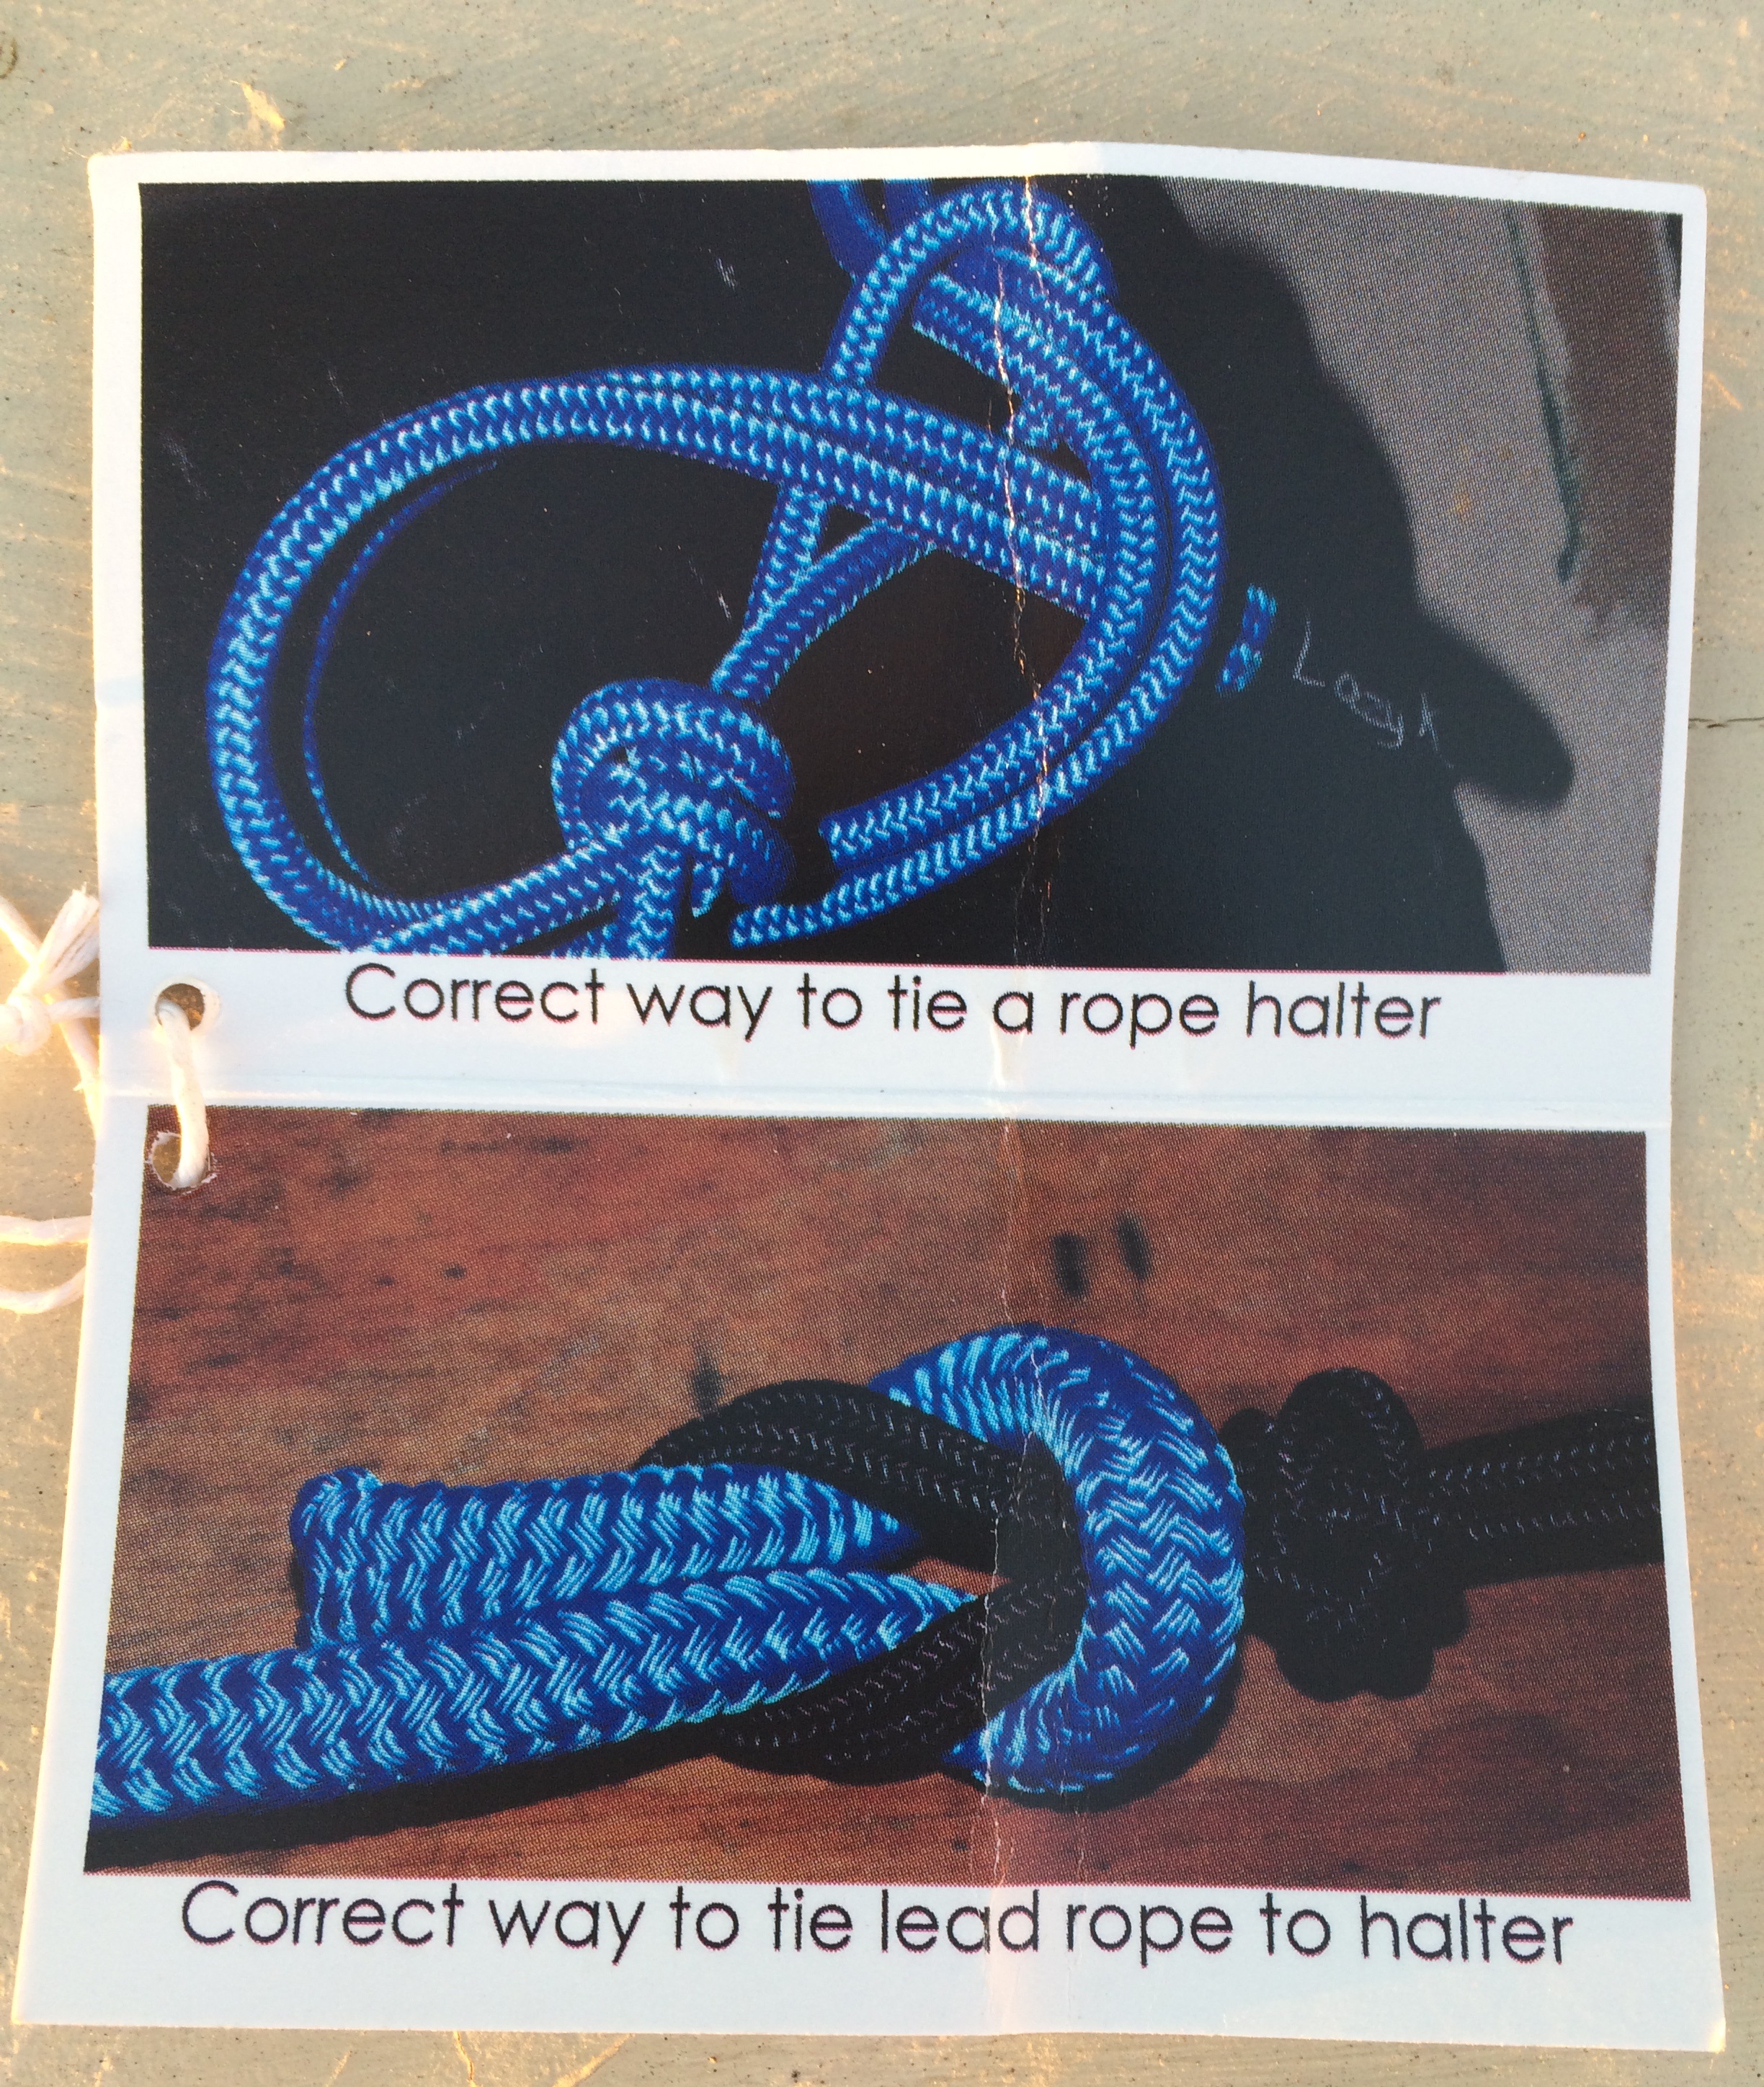
A Rope Halter needs to be tied properly - 90 percent of the time, you will see them tied wrong. When tied wrong, a horse can get loose, the end of the rope can interfere with training and will slap and pop your horse in the eye and the knot will NOT untie easy. It is important to tie it correctly. Learn the right way to tie a rope halter.

Another huge advantage to a Rope Halter is you can lead the horse with it, you can tie the horse, you can trailer load and you can ride the horse. I only ride in Rope Halters. Any horse can be changed or taught to go from a Bit to Roper Halter. It is the rider that needs the knowledge and confidence to get rid of Bits.
With Rope Halters, you do not need head stalls, bits, reins and other things, you have one piece of equipment, a Rope Halter and Lead rope and you can do anything you need to do with your horse. This also helps the horse learn and pay attention to you, rather than new gear, new equipment, new gadgets and pain devices.
A horse finds comfort in routine and consistency. Using one rope halter to lead, ride, tie, catch and interact with your horse is consistent and routine. Ask yourself this question: Why is it that somehow horses all over the world are led, tied, controlled and handled with ONLY one rein (lead rope) and a halter? If all this can happen on the ground, IT CAN HAPPEN IN THE SADDLE.
Make Your Own Rope Halter
What Rope Halter Do I Use / Recommend
I get many questions about what Rope Halter do I use or recommend. Finding a rope halter is a personal choice.
I have used many different types of Rope Halters and I think there are many good ones out there, Clinton Anderson makes a nice one but the rope is a little thin and he rips people off by charging outrageous prices.
Double Diamond makes pretty good halters but they used to put Metal on the end of the tie point so I don't like that part. I like rope halters that are stiffer than the ones that soft and flimsy.
Here is why I DON'T like or recommend Double Diamond Rope Halters.
If anyone would like to contact Double Diamond and tell them their halters should NOT have metal on the tip, here is the contact: Pete Melniker - Pete's Email
Here is one of many examples of why I don't like these halters, here is a comment left on my video & my response.
RE: J Chase
My cousin had a double diamond rope halter. She had it on a horse that she had just got, who didn't know how to tie properly. the horse pulled and where the metal end was tucked in came loose, hit the horse's eye and permanently blinded that eye. She said she would never buy one ever again. ?
My response:
Sorry to hear that, but I have been saying this years and I am glad the president of Double diamond emailed me with a hissy fit about having one of his pictures on my site. Obviously, instead of improving his product and making it safer for horses, he spends his days emailing people about protecting his photos -
I have his link to his email, you should share your story with him - maybe he would not stop crying about me not endorsing his halter and fix his design flaw.
HOW LONG IS MY LEAD ROPE AND REINS?
The length is personal preference. Since I use my rope as reins my size ropes are about 12 to 15 feet, a longer rope tends to work better when lunging, a long rope allows your horse room to react, move and keeps you at a safe distance if needed. It also gives you a long tail to use to direct the horse if needed. Other factors to consider is how long your arms are and long your horse's neck is and don't forget the knot you tie to make your reins. It is better for it to be too long and you can cut later, than too short and you use it.
Clint's halters are thin enough to tie easy but stiff enough to hold shape. I have had several of his halters and they last long and work great. I DO NOT recommend any rope with buckles. Since Clinton Anderson ropes have snaps, I DO NOT like them and do not use them. I have linked his name to his site. I am not paid or compensated in any way for this endorsement. This is my opinion. NO BUCKLES, SNAPS OR CLIPS ON ANY HALTER OR LEAD ROPE. All of these cause pain, cuts, they get caught on things, rust, rubs the rope and makes the rope weaker and frayed.
Note on Sizing: I can never get the sizing link to open so I uploaded the file so you can view it.
Click here for Rope Halter Sizing.
As for what type of rope do I use and like. I like "sail line" used on sail boats. Sail line is very strong and it is made to hold high winds when wet or dry. Since it is made for use in the ocean, it is made to work in salt water, so the sweat (salt) from a horse will not affect the rope and it stays soft and flexible. It comes in different sizes and I like it since it used to come with cotton sheaths but now that is hard to find. Now most have a nylon outer shell. I like my lead rope about 12 to 15 feet long. If you cannot get sail line, you should be able to order it on-line and normally cost about two dollars a foot. If I cannot find sail line I get regular cotton twisted rope. You can get this at most hardware stores and it sells for about 1.50 a foot. It is Not as strong as sail line and wont' last as long, but it works fine. I like 3/4 inch to 1 inch size in the cotton twisted rope.
Below are three links to buy Sail Line or Sail Rope (Double Braided) Online - most Boat Marine Stores have these in stock so you can test the feel in your hands. I like 5/8 Inch or 3/4 inch best. 3/4 is a little big so I prefer 5/8 inch.
Another advantage to the rope halter is when a horse pulls, when wearing a rope halter tied correctly, the rope pulls behind the ears, puts pressure on the pole and is not comfortable. This means the horse will learn to give to give to pressure, pull less and will learn it cannot get free, which are all good lessons. The opposite if true with a nice soft, wide, fur lined nylon halters. The rope halter is only as strong as the knot holding it. Tying the knot correctly, on either the lead rope or halter, is a very important point that is often overlooked. I see lots of rope halters used and very few are tied correctly. If not tied right, it will work loose and the horse will learn to pull and get free. A correct knot will not work loose and will properly secure the horse. An incorrect knot will allow the horse to get free. So when a horse gets free it does not matter if it got free from the snap breaking, the knot giving or the knot securing him to the tie point gives, the horse learns the same lesson, he can get free if he pulls, so you teach a horse to pull.
Click here to see how to tie Rope Halter
Click here to see another way on how to tie Rope Halter
HORSY TIP: The most common reasons a horse gets free is when the rope, the halter or the tie point fails. When a horse pulls back and gets free, the horse does not care why it gets free, it only learns, pulling gets me free, so pulling becomes the right answer. It you make it easy for a horse to get free, the horse learns to always try and get free. Which is why the ignorant method of tying a horse to a hay string in case he pulls so he can break free easy, or the pretty pink break away halters so the halter comes lose if the horse pulls. Very bad lessons.
The flip side to this is also bad. DO NOT LEAVE HALTERS ON HORSES. Below is a picture of a horse that was left in pasture with a halter on. Both web or rope halters will do this damage if left on a horse. You will see the legs are cut up which may have happened when the horse was hung up in the halter went into fear response and panic response. The horse's feet also look neglected so typical horse abuse and neglect - accidents happen, but when you see skinny, neglected feet and then this - to me it is clear that there is a lack of care.
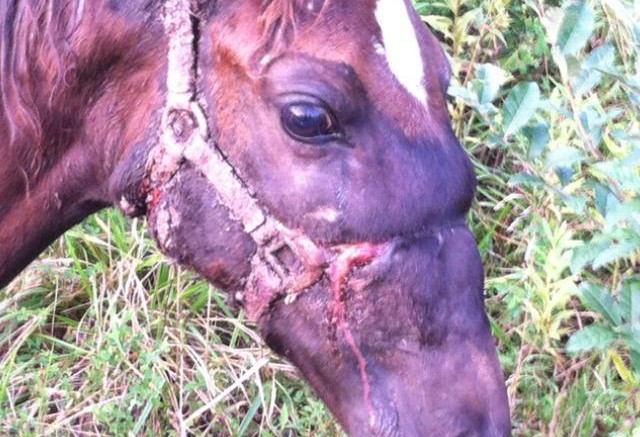
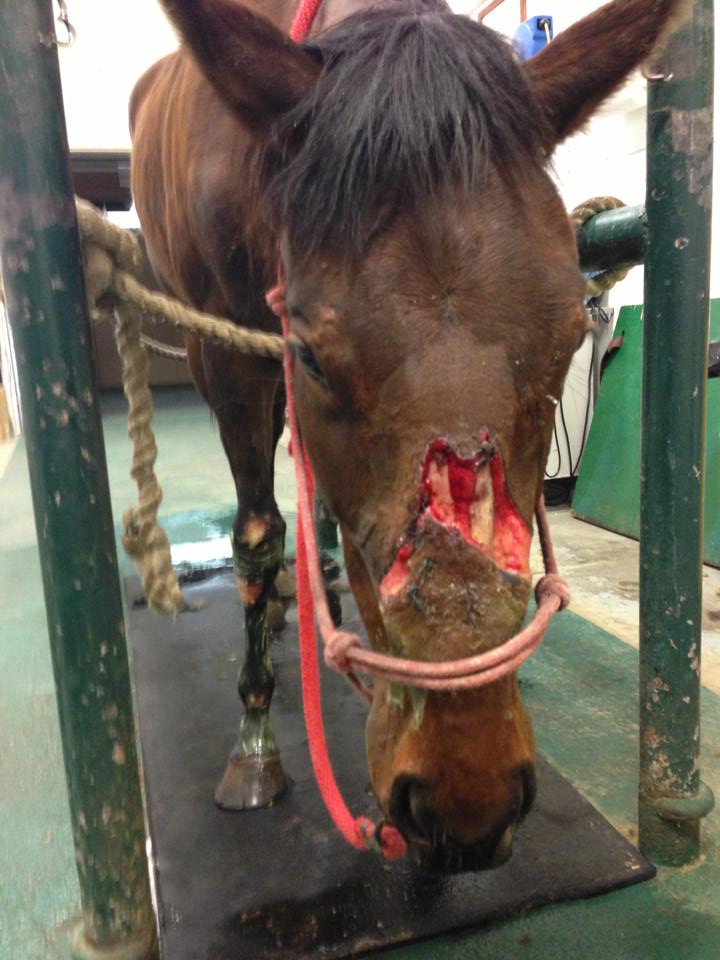
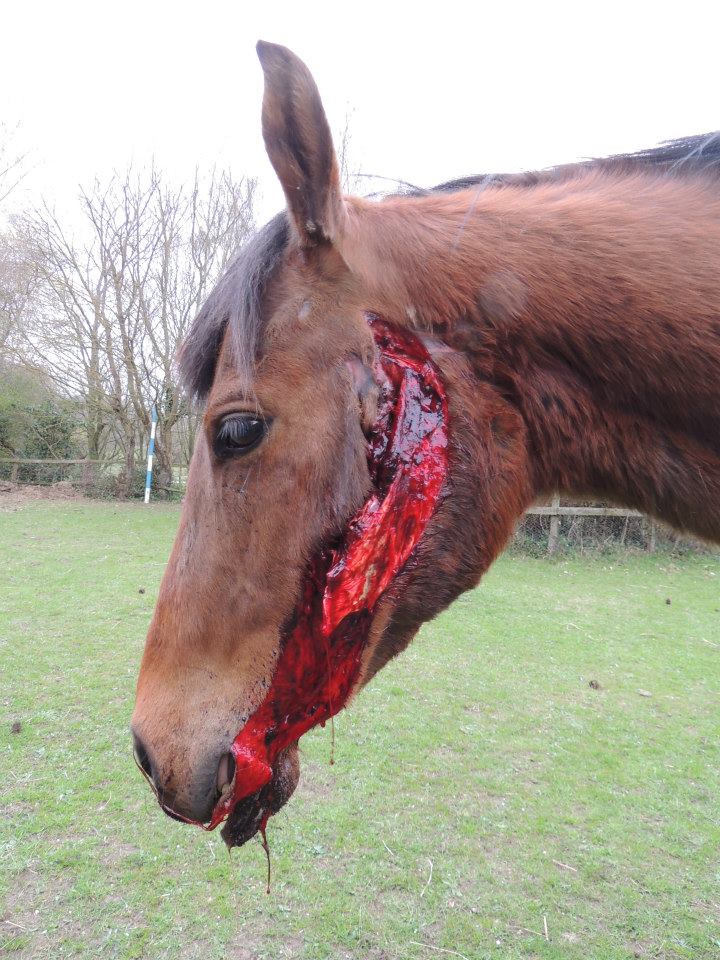


Here are more excuses for being lazy and making a horse pay with it's life, because of foolish actions by the owner. This horse died a horrible death because the owner had a hard time catching it, Inexcusable.

Here is another example of ignorant people leaving halters on horses. This poor horse's skull was found after years later. The halters appears to be a small halter for a foal or baby horse. The horse was left alone or let loose and the halter grew into the bone and killed the horse from stopping the horse from eating, breathing and choking about the neck. What a horrible painful death for this poor horse. All for a stupid human to put a halter on horse and then neglect the horse and leave the halter on until it killed the horse.


Many people don't like rope halters since they have to be tied with a correct knot. It is easier to hook a buckle than learn to tie a proper knot. Tying a rope halter is simple and I have a several pictures to show it tied properly. Invest the time to learn it and you will find it is easier than doing a buckle.


Notice that the finished tie will always have the end of the rope facing away from the eye. Some people tuck the extra hanging end of the rope halter or tie under the chin part of the halter. The pictures below show what the knot looks like when tied correctly.
NOTE: Ensure the loose end of the rope halter always faces AWAY from the horse's eye and towards the horse's neck.
Another thing that adds strength to the rope halters is where the lead rope connects to the rope halter. Since we got rid of snaps and buckles on the halter (since they are t he weakest part) we need to get rid of snaps, hooks and metal on the lead rope. This not only makes the halter and rope stronger, but it gets rid of the annoying buckles that are constantly annoying and banging on your horse's chin. (I know some "trainers" will tell you to use that snap and pop the horse on the chin to get his attention for training your horse) Please, no training takes place with
 pain, only fear happens with pain. Some will say I have seen this work. Just because something works with horses, does mean it is good for the horse. Shocking a horse makes them move, but there are lots of ways to get a horse to move without shocking. So please, when someone tells you something is good because it works, use some common sense and your critical eye. When in doubt, ask yourself, if you were a horse would you like it?
Another problem with buckles is they are heavy and swing which moves and teaches the horse to ignore it, which is what you do not want. You want a horse sensitive to any movement of the lead rope; a rope is more natural and more responsive. Some buckles make noise as they swing. If a horse lowers his head while walking, the buckle swings and hits his legs, if he lowers his head too low the buckle drags on the ground. If you drop the lead rope and the horse steps on the buckle it can get caught on his shoes or break or cause a stone bruise to sole if the horse stands on the buckle. If you happen to grab the buckle and the horse pulls, the buckle can be caught on your rings, or your finger can be caught up in the hole of the buckle. When a horse pulls a buckle or snaps breaks, they are sharp and fly fast, they can cut you or your horse, and they poke your eye or your horse's eye out. All of these are just some of the many reasons to get rid of buckles and snaps. Once again, ask yourself, if I were a horse would I want a rope or buckle hitting my chin? I know I would rather a rope.
Common Ways to Connect Lead Rope to Rope Halters:
The two most common ways to attach a lead rope to a rope halter are demonstrated by the photos below. In the white rope picture (below left), the rope is just pushed up the loop and then circles around the loop and then back down. It should look like a square knot. In the brown rope picture (below center), instead of going back down the loop, it goes under the first rope and will look like a sheet bend knot. The third picture (below right), is how you connect a rope with a loop on the end, it ends up being the same as the fist knot or square knot.


Both knots above are strong and won't slip, some prefer one over the other. The square knot is harder to untie after weight or pull is applied. I do not untie my rope from my halters, so it does not matter to me. I use both knots.
Rope halters are also called Natural Halters or Cowboy Halters. Long ago in the old west days, buckles and snaps were not available like they are today, so most halters were snap less and buckle free. In addition, for those who think you need that heavy snap for training, to pop or annoy your horse, amazingly long ago, when horses were the primary means of transportation, they still seemed to get their horses trained without snaps on lead ropes. I have attached a few images to the left that explain the way to attach a lead rope with a loop at the end. This is very secure and is basically a square knot, so if the loop was cut off you connect like the last picture as described earlier.
How to Tie a Fiador Knot for Bosal or Hackamore
Untying the Halter: Once again, it is important to tie the halter correctly so when under load it will hold and not slip. It is also important so you can untie the halter after a 1300-pound horse sits back on the knot. I see some people using nails, screwdrivers or pliers to try to untie a rope halter. Do not do this. It tears the rope fibers and weakens your halter. It is also not needed. If the halter is tied correctly as in all these pictures, it will untie no matter how much weight is put on it. However, you have to know the proper technique, which is really simple. To untie, just bend the top of the loop backwards and it will untie with ease. The loop I am referring to it the same loop that you put the lose end of the rope in, when you tie it. So bend the loop back onto itself and the knot will come lose. Remember, the knot has to be tied correctly for this to work. Notice on the photo on the left that the excess of the rope is tucked under the chin to keep it from flopping around and possibly hitting the horse in the eye or causing a spook.


Notice in the photos above the excess rope used to tie the halter is always pointing towards the back of the horse, away from the eye. This is quick check of making sure the halter is tied correctly. Also notice the excess rope is tucked into the throat latch area to keep it from flapping and hitting the horse.
In the photo below, when a horse is tied with a good rope halter and lead rope, he will not break away because a snap or buckle breaks. He will only pull once or twice, he will learn he cannot get away and then stand nicely. Using rope halters give much better feel to the horse. Many people use the web halters which are soft, comfortable and do not put any pressure on the horse. Web halters may seem nicer, but they then to teach a horse to pull and tell the horse that he can pull harder without any uncomfortable pressure. This is not good and the horse will soon learn that you cannot stop him from pulling and that you cannot make him uncomfortable when he does pull. Every time a web halter or snap breaks, you teach your horse to pull to get free (in his mind he pulls and gets release).

SNAPS are BAD for Horses
Snaps are a big problem for a horse. In the photo below is a common snap that breaks. I get the best used lead ropes from owners who spend good money for lead ropes with snaps, only to throw them away when the snap breaks. I just cut off the broken snap and I have a nice stronger lead rope, since it has no snaps now. "NO SNAPS" for horses, they bang into the horse's chin, they flop around and give mixed signals, they bounce and hit the horse when he moves, they cause extra weight on the halter so it is harder to be soft and light, they break and flying pieces cut horses and they are just not good for training. I see many "so-called" top trainers selling their "Special" lead ropes with fancy bright buckles. Most all have snaps, which is just unfair to the horse and sets both horse and owner to fail, but they sell good and lots of people in the horse world are always looking for easy shortcuts.

Don't use snaps, it is a cheat, it annoys the horse, it interferes with training, creates pain and fear and THEY BREAK.
Here is a couple results of a two horses that were NOT properly secured. A sad loss of a horse and the unsuspecting people in the cars.


I still see way too many halters tied wrong. I am adding a few more pictures to help make sure this is explained clearly.
I have more pictures of a horse killed by a car on my"Tying A Horse Page"
Below are three photos of a rope halter tie, the photos are linked to animated knots page so you can see this knot tied.


Here is a picture of a regular halter with all the parts labeled. The names would be the same for a rope halter. I DO NOT recommend using this type of halter. They break, they give the horse the advantage, the buckles catch or trap fingers and many other problems. A Rope Halter is much more effective, stronger, no metal parts, last longer and is safer.

BAD TIE: This is just one of the many WRONG ways to tie a rope halter. Once you learn the right way it is very easy to see if a halter is tied properly. So study the right way, you will see many examples of the wrong way if you look. An easy way to remember the right way is the tie, if tied right, the tie is always below the loop and never on top, as in these knots, the tie is above the loop, incorrect. BOTH PHOTOS BELOW ARE INCORRECT "Wrong" TIE


The picture below is called a "slip knot tie". I have a couple of issues with this knot. One issue is the hanging end goes toward the eye, which can hit or injury the eye when the horse runs or moves. The second issue is to undo the slip, after pressure is applied (horse pulls), will be damn near impossible to untie the knot. Therefore, this is no better than the normal tie and in fact worse. Another issue is this knot will not slip (implied by calling is a slip knot) while "under load" (when a horse is pulling) therefore it has little purpose other than to look like a slip knot or quick release knot.

Securing Reins From Lead Rope:
Sometime you will want to or have to ride your horse with just a lead rope and halter. Attaching the reins can be tricky and seems to give many people problems. Here are some photos of how to attach a lead rope to a rope halter so you can have reins and the ability to give direction to your horse from both sides.
This first image is basically taking the lead rope around the horse's neck and then looping the rope around the rope halter, just above where the other end of the lead rope attaches to the halter.
This second image is after making at least two loops and maybe three loops, then you take the end and run it up and over the top (first loop). You do not want to make your loops tight just yet since you will be running the lose end down through the loops so secure your reins.
This third image is showing you running the end of your lead rope down the loops and out the bottom. This will make sure your end is pointing down from the horse and will not interfere or irritate the horse. After pulling this end down then you want to tighten your loops and tighten the knot. This will secure your reins. In this pic the end is run through the rope halter, I normally don't run it through the halter and just run it back over the first loop and then back down. Both works just personal preference.
The final image shows the reins now tight and securely tied. I have a video on Youtube where I show how to do this. How to Connect a Lead Rope to make Reins


FINAL THOUGHT AND SUMMARY: I do not like buckles and snaps. I do not like bits. I like less gear and gadgets. I like simple for me and the horse. A rope halter is functional, strong and simple. Best of all, it is better for the horse.
Kids have less fear - that is why they enjoying their horses more. Reminds me of the saying: "Every horse should be loved by a little girl, at least once in their life."
No bit, no saddle, no spurs, no whips - what's your excuse?

The Legendary Alamar Knot I did a video on this and here is a few pictures to help show the start, middle and finish.


